LibreCAD’s latest build - User Manual
This is the LibreCAD User Manual for latest pre release builds.
The manual is work in progress, and probably not up to date with the latest build application.
Any help is welcome to add new features and modifications to this documentation, to close the gap and make the manual more complete.
Completing and Printing
Completed drawings are normally printed to scale and include a border and title block. However, drawings without a border can be useful for drafts, sketches, exporting to CNC software or a bitmapped image, and so on. In addition to supporting a large variety of paper sizes; ISO, ANSI, Arch (Architectural), custom, etc., LibreCAD also has the ability to print drawings across several pages using tiled printing, allowing a drawing to be printed on smaller paper and assembled into a large format print.
Completing a drawing and making it ready for printing includes a few steps:
Finalizing the page size and drawing scale,
adjusting the dimensions and spacing, and
adding page border and title block as required.
Tip - Using Border and Title Blocks
Adding a border provides a finished look and title blocks include important information for the drawing. Title blocks vary widely in content and layout, but can include:
Drawing name
Project name
Scale
Drawing perspective
Date
Revision
Page number
Paper size
Name of organization
Name of draftsperson, approvers, etc
Others as required
Print Preview Window
LibreCAD’s Print Preview displays the drawing on a virtual page and allows adjustments to the layout prior to committing the drawing to paper. To switch to the print preview window, click the Print Preview icon ![]() or select File -> Print Preview:
or select File -> Print Preview:
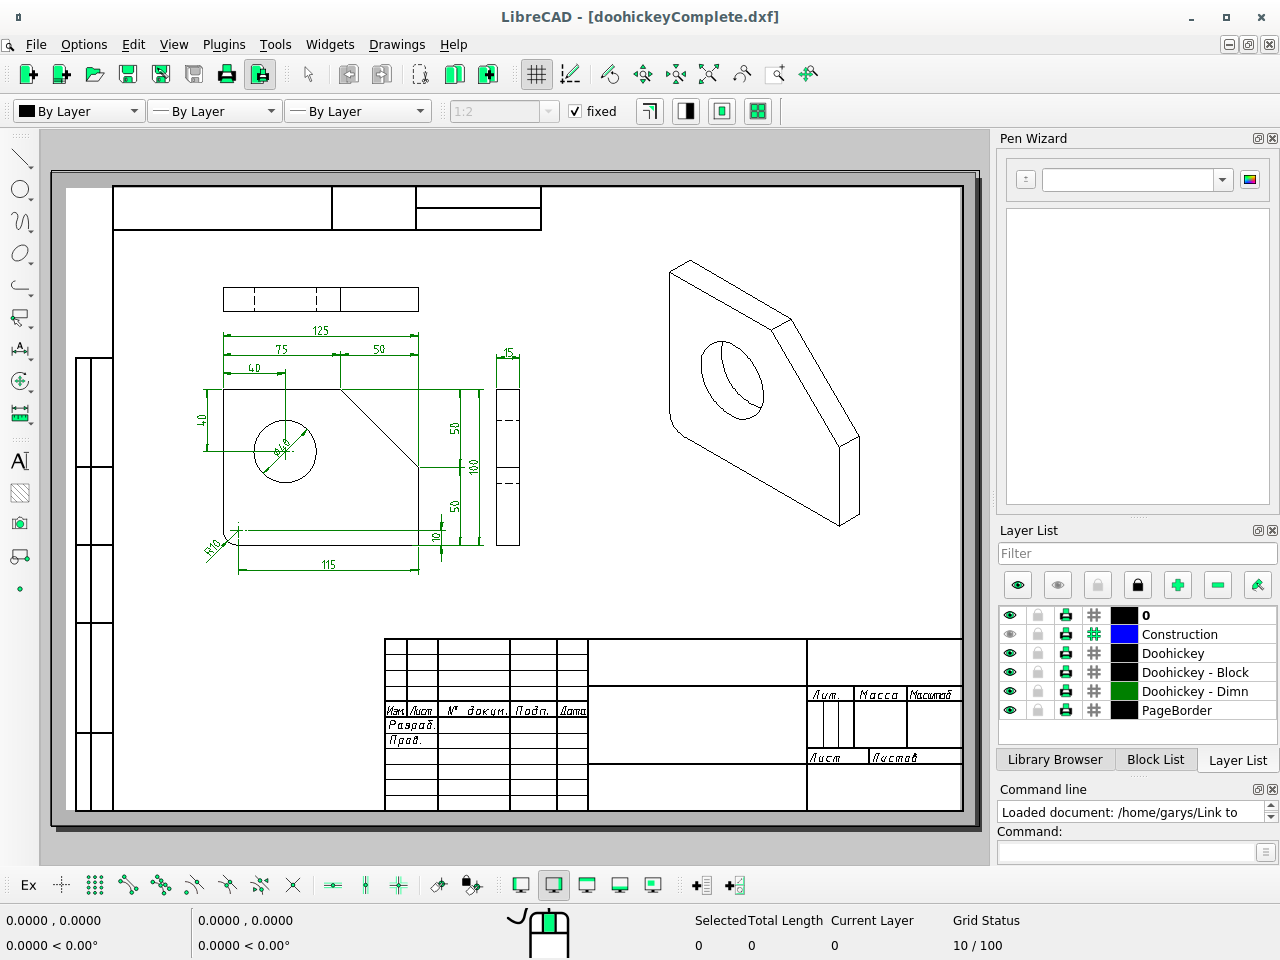
LibreCAD’s Print Preview window displaying the Doohickey drawing
Opening the print preview window also displays the Print Preview Tool Options toolbar:

More details for Print Preview Tool Options can be found in the Reference / Toolbars / Tool Options section.
The print preview window shows the virtual page as a white rectangle with a black border and a drop shadow. The black border represents the paper format and orientation as it is configured on the “Paper” tab of the Drawing Preferences. If margins are specified on the “Paper” tab, they are shown as a dark grey border.
Printing
While a drawing can be printed directly by clicking the Print icon ![]() or selecting File -> Print, the recommended approach is to print drawings from the Print Preview window:
or selecting File -> Print, the recommended approach is to print drawings from the Print Preview window:
Starting with the drawing open in the drawing window:
Switch to print preview window by clicking the Print Preview icon
 .
.Open the Drawing Preferences (Options -> Current Drawing Preferences) and check the paper layout (“Format”, “Orientation” and “Margins”) for the current drawing: e.g. A4, Landscape, Top, Bottom Left and Right Margins each at 10. Adjust the layout if necessary and click OK.
Click the Fit to Page icon
 on the toolbar. This will ensure the drawing is scaled to fit the current paper format and centered on the page.
Click the Print icon
 or select File -> Print.
Select the printer on the Print dialogue and confirm the properties by clicking the Properties icon. Adjust the properties if necessary and then click the Print button.
Tiled Printing
Tiled printing provides the ability to print a scaled drawing that is larger than a printer’s available paper format. Tiled printing is useful where a drawing needs to be printed at a fixed scale that would otherwise require a large format printer. The drawing is printed across several pages that can be assembled into a large single document.
Tile printing uses “Format” and “Orientation” found on the “Paper” tab of the Drawing Preferences. It lays out the pages horizontally and vertically in a grid pattern to form a single large format page to accomodate a scaled drawing. For example, a portrait A4 page with 2 pages horizontally and 1 vertically would result in a page 420 x 297 mm, or a landscape A4 in a 2 x 2 pattern would be a page of 594 x 420 mm. Note that both examples use a margin of 0. If margins are defined, the assembled document is reduced by the margin widths on the common edges of the paper where they are assembled.
To print a tiled document, starting with the drawing open in the drawing window:
Switch to print preview window by clicking the Print Preview icon
.Click the Fit to Page icon
on the toolbar. This will ensure the drawing displayed correctly in the print preview. Note that “fixed” needs to be unchecked.Open the Drawing Preferences (Options -> Current Drawing Preferences) and check the paper layout (“Format”, “Orientation” and “Margins”) for the current drawing: e.g. A4, Landscape, Top, Bottom Left and Right Margins each at 10. Adjust the values if necessary and click OK. (The “Number of Pages” will be calculated below.)
Adjust the scale as desired. Change the print scale by:
Selecting a predefined scale ratio from the drop-down, or type the required scale ratio in the text-box and press [Enter].
Lock the print scale by placing a checkmark in the “fixed” checkbox.
Click the Calculate number of pages… icon
 on the toolbar. The print preview will show a grid of pages with the drawing placed in the center. The Number of pages on the “Paper” tab will be updated to reflect the number of pages shown in the print preview.
Adjust the position of the drawing image on the page by repositioning the paper by dragging it as needed (the drawing stays centered on the screen). Click and hold anywhere in the drawing space and drag the paper to the desired position. Pressing [Shift] allows only horizontal movements of paper and pressing [Ctrl] allows only vertical movements.
If necessary, adjust the dimensions “General Scale” and dimension line placement. Refer to Adjusting Dimensions for Printing in Dimensioning and Text for details.
Click the Print icon
or select File -> Print.Select the printer on the Print dialogue and confirm the properties by clicking the Properties icon. Adjust the properties if necessary and then click the Print button.
In case when a page has the margins (margins > 0) the print preview takes on a special look in that the margins between a neighboring pages aren’t shown. It makes possible to represent the printable areas of all pages as one whole area and to show an undivided drawing. Or, in other words, the print preview looks like the assembled drawing.
Tip - Setting the Margins
Set the margins to the printer’s minimum margins when using tiled printing to maximize the assemble print size.
Next example shows the print preview (left) and the output of tiled printing with the margins (right):
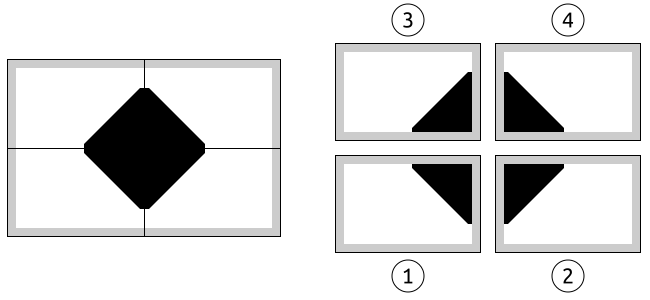
The sequence of the output is from bottom left page to top right page. In the picture above the order of the output is marked by numbers.
Completing and Printing a Drawing
A finished drawing will include a border / title block and be scaled to suit the paper format and orientation. See Scale and Dimensioning in the Drawing Setup for more details on determining the suitable scale for a drawing.
Important
These steps assume a drawing that is drawn to full-scale (1:1).
Starting with the drawing open in the drawing window:
Switch to print preview window by clicking the Print Preview icon
.Click the Fit to Page icon
on the toolbar. This will ensure the drawing displayed correctly in the print preview. Note that “fixed” needs to be unchecked.Open the Drawing Preferences (Options -> Current Drawing Preferences) and check the paper layout (“Format”, “Orientation” and “Margins”) for the current drawing: e.g. A4, Landscape, Top, Bottom Left and Right Margins each at 10. Adjust the layout if necessary and click OK.
Click the Fit to Page icon
on the toolbar. This will ensure the drawing is scaled to fit the current paper format and centered on the page. Note the scale in the text-box of the print preview toolbar.Adjust the scale using a smaller ratio than the “Fit to Page” scale. For example use “1:2” if “1:1.18” is the calculated scale. Change the print scale by:
Selecting a predefined scale ratio from the drop-down, or type the required scale ratio in the text-box and press [Enter].
Lock the print scale by placing a checkmark in the “fixed” checkbox.
Adjust the position of the drawing image on the page by:
Clicking the Center to Page icon
 , or
, orrepositioning the paper by dragging it as needed (the drawing stays centered on the screen). Click and hold anywhere in the drawing space and drag the paper to the desired position. Pressing [Shift] allows only horizontal movements of paper and pressing [Ctrl] allows only vertical movements.
Close the print preview window by clicking the Print Preview icon
.If necessary, adjust the dimensions “General Scale” and dimension line placement. Refer to Adjusting Dimensions for Printing in Dimensioning and Text for details.
If using a border / title page block, insert the block from the Library Browser:
Insert a block from sheets that matches the paper format and orientation, e.g. “A4H” for a landscape A4 page.
Set the blocks scale “Factor” suit the scale determined above, e.g. “2” for a drawing scale of 1:2. See Inserting Blocks in Using the Library Browser for details.
“Explode” the border block and add/modify text using the “Properties” tool. Refer to the Modify tools.
Switch to the print preview window and check the completed drawing. If necessary, click “Zoom All” and then “Fit to Page” to align the drawing to the paper.
Click the Print icon
or select File -> Print.Select the printer on the Print dialogue and confirm the properties by clicking the Properties icon. Adjust the properties if necessary and then click the Print button.